Local Buisness AggregateRating Schema SOP
Create a Custom HTML Tag for Local Business Schema with Aggregate Rating and Implament with GTM.
1 Log in to Google Tag Manager
- Go to Google Tag Manager and log in from the Reporting account.
- Select the container for your website, this should be identifiable by client name.
1.2 Create a New Tag
- In the GTM dashboard, click on Tags from the left-hand menu.
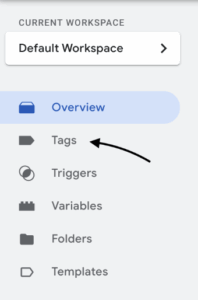
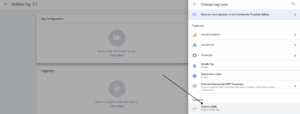
- Click the New button to create a new tag.

- Under Tag Configuration, choose Custom HTML.
1.3 Add Local Business Schema with AggregateRating Markup
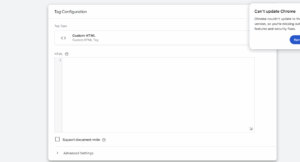
In the HTML text box, paste the JSON-LD schema markup for Local Business with AggregateRating. For example:
json
Copy
<script type=”application/ld+json”>
{
“@context”: “https://schema.org”,
“@type”: “LocalBusiness”,
“name”: “Your Business Name”,
“address”: {
“@type”: “PostalAddress”,
“streetAddress”: “123 Business St”,
“addressLocality”: “City”,
“addressRegion”: “State”,
“postalCode”: “12345”,
“addressCountry”: “US”
},
“telephone”: “+1-800-555-1234”,
“url”: “https://www.yourbusinesswebsite.com”,
“aggregateRating”: {
“@type”: “AggregateRating”,
“ratingValue”: “4.5”,
“reviewCount”: “120”
}
}
</script>
- Replace the placeholder values with your own business data:
- Your Business Name
- Street Address, City, State, Postal Code
- Phone Number
- RatingValue: Average rating (e.g., 4.5)
- ReviewCount: Total number of reviews (e.g., 120)
This schema provides search engines with detailed information about your business and its aggregate rating.
1.4 Set Triggers to Apply Schema on All Pages

To apply this schema markup across all pages:
- After entering your Custom HTML code, click Triggering to choose when the tag should fire.
- Select Page View > All Pages. This ensures the Local Business schema tag will fire on every page of your site.
Step 2: Publish the Tag in GTM
2.1 Publish the Changes
Once you’ve verified that the schema is correctly firing and recognised by Google:
- In Google Tag Manager, click the Submit button in the top right corner.
- Provide a version name (e.g., “Added Local Business Schema”) and a description for your changes (optional).
- Click Publish to make the changes live on your website.
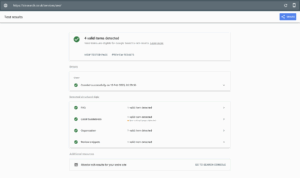
Step 3: Verify Schema Across All Pages
3.1 Regularly Monitor the Schema
- After applying the schema, regularly monitor your website’s structured data in Google Search Console under Enhancements > Structured Data.
- Google will notify you if there are any issues with your structured data implementation (e.g., missing fields, invalid schema).
- You can also use the Rich Results Test to check individual pages and ensure everything is still working as expected.